Difference between revisions of "CHARGE Anywhere Not Displaying"
| (21 intermediate revisions by the same user not shown) | |||
| Line 5: | Line 5: | ||
When presented with a list of options choose "Start Task Manager" | When presented with a list of options choose "Start Task Manager" | ||
| − | *For Windows 7: click on the | + | *For Windows 7: click on the Processes tab and look for the Quickbooks process '''QBW32.exe''' click on this process and select End Process |
| − | *For Windows 8 and Windows 10: look for the Quickbooks | + | *For Windows 8 and Windows 10: look for the Quickbooks process '''Quickbooks(32bit)''' click on this process and select End Process |
| + | |||
| + | |||
| + | <center><gallery widths=324px heights=360px perrow=2> | ||
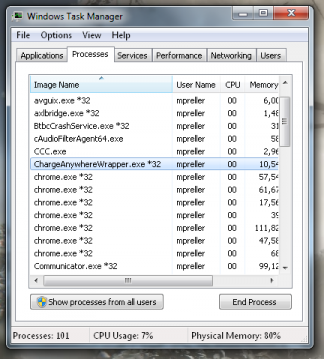
| + | File:Task Manager.PNG| '''1. Ending the Charge Anywhere Process in Windows 7''' | ||
| + | File:Task Manager2.PNG| '''2. Ending the QuickBooks Process in Windows 7''' | ||
| + | </center></gallery> | ||
| Line 14: | Line 20: | ||
'''3.''' Right click on your Quickbooks icon and choose the option "Run as Administrator" Log in as the Quickbooks Administrator and you should now see the Charge Anywhere located in your Company drop down menu | '''3.''' Right click on your Quickbooks icon and choose the option "Run as Administrator" Log in as the Quickbooks Administrator and you should now see the Charge Anywhere located in your Company drop down menu | ||
| + | |||
| + | |||
| + | |||
| + | '''Quickbooks 2018''' has introduced an issue for Third Party Applications. If you recently upgraded to Quickbooks 2018 you may not see the Charge Anywhere in your company dropdown. | ||
| + | |||
| + | |||
| + | '''1.''' Log into Quickbooks as the Admin user. | ||
| + | |||
| + | '''2.''' From the File menu choose the option '''Switch to Single User Mode''' | ||
| + | |||
| + | '''3.''' In Single User Mode, from the Edit menu choose the option '''Preferences''' | ||
| + | |||
| + | '''4.''' Choose '''Integrated Applications''' and then choose the '''Company Preferences''' tab | ||
| + | |||
| + | [[File:Double_Cert.PNG|thumb|center|400px]] | ||
| + | |||
| + | '''5.''' Choose to remove the two Charge Anywhere Certificates | ||
| + | |||
| + | '''6.''' Follow the steps at the top of the page to close Quickbooks and restart using the Run as Administrator option | ||
| + | |||
| + | [[File:Cert.PNG|thumb|center|400px]] | ||
| + | |||
| + | '''7.''' Choose the options '''Yes whenever this Quickbooks company file is open''' and '''Allow this application to access personal data''' and choose Continue. You should now see the Charge Anywhere in your Company Dropdown | ||
If you have any questions or if the above steps did not work, please contact us at 800-211-1256 option 1 for Tech Support | If you have any questions or if the above steps did not work, please contact us at 800-211-1256 option 1 for Tech Support | ||
Latest revision as of 09:25, 11 June 2018
If Charge Anywhere is not showing up in your Quickbooks Company Dropdown it means you will need to run the Quickbooks program as a Windows administrator. You can resolve this with the following steps.
1. In order to make sure the Quickbooks application has completely stopped press Ctrl + Alt + Delete on your keyboard.
When presented with a list of options choose "Start Task Manager"
- For Windows 7: click on the Processes tab and look for the Quickbooks process QBW32.exe click on this process and select End Process
- For Windows 8 and Windows 10: look for the Quickbooks process Quickbooks(32bit) click on this process and select End Process
1. Ending the Charge Anywhere Process in Windows 7
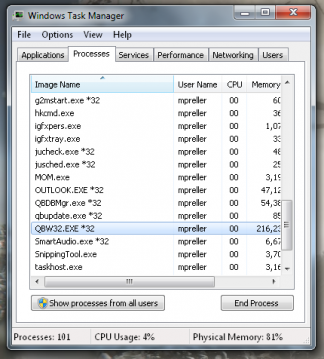
2. Ending the QuickBooks Process in Windows 7


2. With the Quickbooks application closed look for the application in your Task Manager Charge Anywhere Wrapper. Click on this process and select End Process.
3. Right click on your Quickbooks icon and choose the option "Run as Administrator" Log in as the Quickbooks Administrator and you should now see the Charge Anywhere located in your Company drop down menu
Quickbooks 2018 has introduced an issue for Third Party Applications. If you recently upgraded to Quickbooks 2018 you may not see the Charge Anywhere in your company dropdown.
1. Log into Quickbooks as the Admin user.
2. From the File menu choose the option Switch to Single User Mode
3. In Single User Mode, from the Edit menu choose the option Preferences
4. Choose Integrated Applications and then choose the Company Preferences tab

5. Choose to remove the two Charge Anywhere Certificates
6. Follow the steps at the top of the page to close Quickbooks and restart using the Run as Administrator option

7. Choose the options Yes whenever this Quickbooks company file is open and Allow this application to access personal data and choose Continue. You should now see the Charge Anywhere in your Company Dropdown
If you have any questions or if the above steps did not work, please contact us at 800-211-1256 option 1 for Tech Support