Add-On Features

Comsgate Bill Pay
Bill Presentment is an electronic invoicing solution that enables merchants to email invoices to collect customer initiated credit card and ACH payments with their own PCI secure online payment form hosted by Charge Anywhere. Merchants improve cash flow by streamlining their billing process and save money on postage and costs associated with mailing invoices. Merchants can customize the secure Bill Presentment payment form to include their company logo, color and text to reinforce their brand with their customers.
Bill Pay setup
This section contains the fields to be configured for the Bill Presentment Payment Form that the customer will view after clicking the PAY NOW button within the email. Enable the fields that you want to configure on the Bill Presentment Payment Form and enter or choose the values that you desire. You can click on “Preview” to view the configured payment form based on the setting entered. When finished, press “Update”.
Header Specifications
You can customize the Header by configuring the following items:
- Header Company Logo: insert you company logo to display as your header. The recommended file size is (145x65)px. You can adjust the file size as needed after previewing.
- Header Background Color Picker: select the color or enter the hexadecimal color code to display as your header background.
- Header Text: insert text to display as your header.
- Header Color Picker: select the color or enter the hexadecimal color code to display as your header text color.

Form Background and Page Layout
You can align the Header, Form and Footer by configuring the following items:
- Form Background Color Picker: select the color or enter the hexadecimal color code to display as your background.
- Form Button Background Color Picker: select the color or enter the hexadecimal color code to display as your button background.
- Form Button Text Color picker: select the color or enter the hexadecimal color code to display as your text button.
- Select the Header alignment (left or center)
- Select the Form alignment (left or center)
- Select the Footer alignment (left or center)

Footer Specifications:
You can customize the Footer by configuring the following items:
- Footer Background Color picker: select the color or enter the hexadecimal color code to display as your footer background, or select “Same as Header”.
- Footer Text: insert text to display as your footer
- Footer Color picker: select the color or enter the hexadecimal color code to display as your text footer, or select “Same as Header

Configuration Form:
You can customize your merchant name/DBA, email address and transaction options:
- Merchant DBA: Specify a name you want your customer to see.
- Merchant Email: specify a “from” email address used to send the invoice.
- Enable the box “Copy Merchant” if you want to receive a copy of the invoice.
- Transaction Type: Sale
- Convenience Type: select None, Amount or Percentage if you want to apply a convenience fee.
- Email Message: enter a default message that will be included in the body of the email. This content can be changed each time when sending a Bill Presentment.

Send Invoice To a Customer:
To send an invoice to a customer, click on Virtual Terminal, Bill Presentment, Send Invoice to Customer. You can attached an invoice by choosing the file, and then click on “Attach” (optional). Fill out the form with the appropriate customer information to generate the invoice to be emailed. The form will include the default information for Merchant Email and Email Message entered when you initially configured Bill Presentment Setup. This information can be changed prior to sending the email. When creating the form, you must enter a Customer Email and add at least one item. Customer Name, Invoice Number and Description are optional fields. As an added option, you may also upload a file to be included as an attached with the email. Click on Choose File and search for the document to be included, then click Attach. You can remove the attachment before sending by clicking on Remove File. If you are including an invoice as an attachment and do not wish to enter invoice details in the Add Items section, simply enter one item with the total amount for the invoice.

View Bill Presentments:
This section will allow you to view all your Bill Presentments. You can search by Customer Name, Invoice Number, Amount, or Bill State (Created, Sent, and Paid). You can also Resend Bill or Close Bill. If the invoice was paid by the customer through the Bill Presentment email, the State will change to “Paid-Charge Anywhere”. If the invoice was paid other than through the Bill Presentment email, as an optional step, you can click on Close Bill and the State will change to “Paid-Other”

How Your Customer Will Process The Payment:
After you send a Bill Presentment, your customer will receive an email with the message you included in Email Message when generating the Bill Presentment. A link to pay the invoice called “Click here to Process Payment” will be included under the Email Message.

When the customer clicks on “Click here to Process Payment” the Payment Form will open

The customer will be prompted to enter the payment information to process the payment. If approved, an approval code will be generated. If the payment is declined, a declined message will appear.

Customer and Merchant will both receive a copy of the receipt once the transaction has been completed.

Once the payment has been successfully processed, the status of the invoice in View Bill Presentments will change from “Pending” to “Paid-Charge Anywhere”.

Comsgate Bill Pay demo
Customer Database
The customer database is the collection of information that is gathered from each customer. The database will include contact information, like the person's name, address, phone number, e-mail address, and payment information.
Search Criteria: You may filter your search for an existing customer by Customer #, Company Name and Phone No.
Actions:
Add Customer: You may create a new customer and assign a Customer #. You may input the billing and shipping data: First Name, Last Name, Company Name, Address, City, State, Zip Code, Country, Phone, Fax and/or Email.
- Once customer is added, it will display within the customer database and in the Customer Profiles of Web Terminal.
Import Setup: You may choose to import customers into the customer database from a CSV spreadsheet or comma delimited text file. You will use import setup to match the relevant columns on your spreadsheet. Use Skip to bypass a field.
Import Customers: Once you have configured your Import Setup, browse for the CSV spreadsheet or comma delimited text file and Submit.
Export Customers: You are able to export your customer database into a comma delimited text file. This can easily be converted into an excel spreadsheet by adding ".csv" to the end of the file name. (e.g, "Testexport.csv")
Credit Cards Report: Displays all credit cards for all customers within the Customer Database. You can filter your search to by credit card expiration date (MMYY).
Expired Credit Cards Report: Display all credit cards that are expired for any customer within the Customer Database.
How to add a customer to your Customer Database:
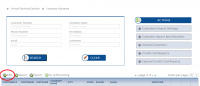
1. The merchant will hover their mouse over Virtual Terminal > Virtual Terminal Option > click on Customer Database.
2. In Customer Database, the merchant will click on +Add in the middle to the left.
3. In the next screen they will enter the Customer Number (required) and Billing Data if needed (not required).
4. Click on Submit at the bottom.
5. On the next screen, the description (type of card, VISA, MC, etc.) Full Name, Card Number, and Exp Date. Address (billing street number) and Zip Code are optional.
6. Next click on Add to save. They will then see the payment method saved.
7. Finally click on Edit, Delete, or Add Recurring to create a Recurring Payment or click Back to add the next customer.
1. Main Screen, click on Add
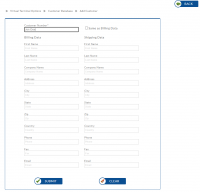
2. Add Customer Name and Information
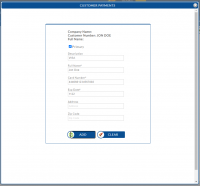
3. Add Payment Method
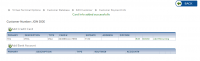
4. Payment Method Added Successfully


Recurring Database
A recurring database is used to process credit card sales on a predetermined date for a set amount within a set interval. All active recurring payments will be listed at the bottom of the page. Along with the recurring transaction, you have the option to edit the recurring transaction, view the history, delete the recurring payment and process payment now.
Search Criteria: You may filter your search of the recurring database by Effective Date, Date Created, Frequency, Customer #, Active/Inactive, Company Name, Identification, Amount, Card Number, Invoice #.
Export Recurring Database: You are able to export the information in your recurring database into a comma delimited text file. This can easily be converted into an excel spreadsheet by adding ".csv" to the end of the file name. (e.g, "Testexport.csv")
Recurring Email Settings
Use the recurring emails settings to configure reminders or notifications to either you or your customer that a recurring transaction will take place or has taken place.
Enable Reminder Emails for Customers: Choose this option if you want your customers to receive
email reminders 7 days prior to the executing the recurring payment. (The email will be sent to the email address on file in your Customer Database. Click the magnifying glass on the right hand side to preview the email.)
Enable Reminder Emails for Merchant: Choose this option if you want the merchant to receive
email reminders 7 days prior to the executing the recurring payment. (The email will be sent to the email address CHARGE Anywhere has in your customer profile. Click the magnifying glass on the right hand side to preview the email.)
Enable Notification Emails for Customers: Choose this option if you want your customers to receive email
notification when the recurring payment executes. (The email will be sent to the email address on file in your Customer Database. Click the magnifying glass on the right hand side to preview the email.)
Enable Notification Emails for Merchant: Choose this option if you want the merchant to receive email notification
when the recurring payment executes. (The email will be sent to the email address CHARGE Anywhere has in your customer profile. Click the magnifying glass on the right hand side to preview the email.)
URL to Post Reminders: Your Web Master may take the data that is sent to the webpage entered and configure it on a webpage.
URL to Post Notifications: Your Web Master may take the data that is sent to the webpage entered and configure it on a webpage.
MerchantLogo: This is the logo that will appear on top of the email. Browse your computer for the logo file.
MerchantURL: This is the web page that will be displayed when a customer clicks on the logo.
Customer Support Email: Email address specified within the email that the cutomer can use to contact you.
Customer Support Phone: Phone Number specified within the email that the cutomer can use to contact you.

Adding a Recurring Payment
To add a recurring payment:
1. Go to Virtual Terminal > Virtual Terminal Options > Recurring Database > Click on Add. Fill out the appropriate fields.
- Devices: Select a terminal to associate the recurring transaction with.
- Customer Info: Search for a customer from your Customer Profiles section on the right-hand side. (Customer Profiles list all customers in your Customer Database).
- Customer: Select the customer from your search list.
- Payment Type: Select from Credit Card and/or Bank Account. (For ACH an ACH processor is required).
- Payment Profile: If customer exist already in Customer Database, Payment Profile will display the available cards to associate the recurring payment with.
- Plan Type: Select from Recurring and/or Installment.
- Amount Per Recurring/Total amount for Installment: Enter transaction amount that will be processed on each recurring payment. If installment is selected then enter the total amount.
- Frequency: Choose how often payments will be processed. (Daily, Weekly, Biweekly, Monthly, Annually, Quarterly, Semiannually)
- Number Of Payments: Enter the amount of payments/installments. Note that recurring offers the option for Unlimited number of payments while Installments do not.
- Start Date: Select the date when the first transaction will be processed. (Effective Date cannot be today)
- End Date: Select last payment date for recurring or installment payment.
- Amount Per Installment: If installment is selected enter the amount per installment.
- Invoice/Reference Number: You may choose to enter an invoice # or reference number. This field is used as a reminder of why you added the recurring payment.
2. Click Add once finished and the recurring payment/Installment will be stored within your Recurring Database.
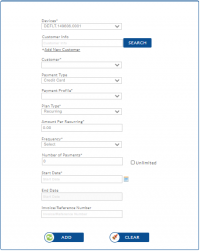
1. Add Recurring Payment
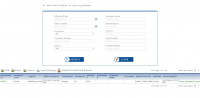
2. Recurring Payment Added


Cash Discount
Cash Discount - Cash Discount program provides a solution for a merchant to offset credit card processing fees. By offering a decreased price for cash purchases, merchants reward customers for paying in cash and in turn retain the money you would have paid in credit card processing fees. If enabled, the QuickSale app will apply a designated Cash Discount amount or percentage to every transaction. Cash Discount is currently available on QuickSale mPOS, QuickSale POS, QuickSale Terminal and Comsgate Virtual Terminal.
Label - Enter the text you want to appear for the Cash Discount Prompt
Mode - Choose to apply a fixed dollar amount or a percentage
Fixed Amount - Appears if Mode is set to Fixed Amount. Enter the dollar amount to apply to the transaction
Fee% - Appears if Mode is set to Percent. Enter the percentage to apply to the transaction
Fee% Mode - Appears if Mode is set to Percent. Choose whether to apply the percentage to only the amount, amount + tax, amount + tax + tip
Tender Types - Check off the tender types that the Cash Discount will be applied to.
<gallery widths=200px heights=400px> File:CDTM.PNG| 1. Cash Discount on VT File:CDMPOS.PNG| 2. Cash Discount on mPOS & QS Terminal File:CDCR.PNG| 2. Cash Discount on QS POS