|
|
| Line 4: |
Line 4: |
| | | | |
| | <center>'''Welcome to the CHARGE Anywhere® Mobile Payment App Knowledge Base!'''</center> | | <center>'''Welcome to the CHARGE Anywhere® Mobile Payment App Knowledge Base!'''</center> |
| − | <center>The Mobile Payment App is available for [[Android]], [[BlackBerry]], [[Apple iOS]], [[J2ME]], and [[Windows Mobile]]. </center> | + | <center>Mobile Payment App is available for [[Android]], [[Apple iOS]], [[BlackBerry]], [[J2ME]], and [[Windows Mobile]] operating systems.</center> |
| | | | |
| − | <div align="center">[[File:AndroidHome.jpg|280px]]</div> | + | <div align="center">[[File:Thunderbolt_Ad.jpg|540px|link=Android]]</div> |
| | | | |
| − | ==Overview== | + | =='''Overview'''== |
| − | '''CHARGE Anywhere®'s Mobile Payment App''' gives merchants the ability to process transactions securely from their smartphone or tablet. The Mobile Payment App is can be used on an array of mobile devices that use [[Android]], [[BlackBerry]], [[Apple iOS]], [[J2ME]], and [[Windows Mobile]] operating systems. It also offers the ability to accept multiple tender types: '''Credit, Cash, Check, Gift/loyalty, and ACH/eCheck'''. A Credit Card Merchant Account and ACH Merchant Account is required to process credit card payments and ACH transactions respectively. CHARGE Anywhere does not provide Merchant Accounts but is compatible with all major Payment Processors in the US & Canada. | + | '''CHARGE Anywhere®'s Mobile Payment App for Android''' is the industry's most complete mobile payment solution. CHARGE Anywhere's award winning Mobile Payment Solution gives merchants the ability to process transactions securely from their smartphone or tablet. The app offers the ability to accept multiple tender types: Credit Card, Cash, Check, Gift/loyalty, and ACH/eCheck. Included with the solution is our PA DSS Payment Gateway, ComsGate Transaction Manager and a Free Virtual Terminal. |
| | | | |
| − | '''System Requirements:''' | + | '''Available for:''' [[Android]], [[Apple iOS]], [[BlackBerry]], [[J2ME]], and [[Windows Mobile]] operating systems. |
| − | Internet Connectivity is required to transmit transaction data.
| |
| | | | |
| − | *[[Android]]: 2.0_OS or higher
| + | '''System Requirements:''' Internet Connectivity is required to transmit transaction data. |
| − | *[[BlackBerry]]: 4.5_OS or higher
| |
| − | *[[Apple iOS]]: 3.1_OS or higher
| |
| − | *[[J2ME]]: CLDC 1.1 and MIDP 2.0
| |
| − | *[[Windows Mobile]]: 5.0_OS to 6.5_OS
| |
| | | | |
| − | '''Supported Peripherals:''' See [[Peripheral Help]]
| + | [[Android]]: OS 2.0 or higher |
| | + | |
| | + | [[Apple iOS]]: OS 3.1 or higher |
| | + | |
| | + | [[BlackBerry]]: OS 4.5 or higher |
| | + | |
| | + | [[J2ME]]: CLDC 1.1 and MIDP 2.0 |
| | | | |
| − | '''Features:''' Online Transaction Manager & Virtual Terminal, Electronic Signature Capture, Record of transaction location (GPS), Offline Mode (Store and Forward), AVS & CVV2, Level 1 & Level 2 Purchase Cards
| + | [[Windows Mobile]]: OS 5.0-6.5 |
| | | | |
| − | '''Add On Features:''' Bill Presentment; Recurring Database; | + | '''Supported Peripherals:''' See [[Peripheral Help]] |
| | | | |
| | + | '''Features:''' Free Online Transaction Manager & Virtual Terminal, Electronic Signature Capture, Record of transaction location (GPS), Offline Mode (Store and Forward), AVS & CVV2, Level 1 & Level 2 Purchase Cards, Optional Prompts (tips, clerk#, tax%, customer#) |
| | | | |
| − | ''(The Mobile Payment App is generally the same across all operating systems with a few minor differences. This page will provide details on the Android operating system, but you may view the details of other operating systems by clicking the links above.)'' | + | '''Add On Features:''' Bill Presentment; Recurring Database |
| | | | |
| − | ==Getting Started==
| + | ''A Credit Card Merchant Account and ACH Merchant Account is required to process credit card payments and ACH transactions respectively. CHARGE Anywhere does not provide Merchant Accounts but is compatible with all major Payment Processors in the US & Canada.'' |
| | | | |
| | + | =='''Getting Started'''== |
| | + | [[File:GooglePlay.png|thumb|right|200px]] |
| | '''1. Download the CHARGE Anywhere Payment App from the Google Play Store.''' | | '''1. Download the CHARGE Anywhere Payment App from the Google Play Store.''' |
| − | *You can click the following link to obtain the download - https://www.chargeanywhere.com/Downloads/android.html | + | *Click the following link to obtain the download: https://www.chargeanywhere.com/Downloads/android.html |
| | *or go to the Play Store from your phone/tablet and search for CHARGE Anywhere. | | *or go to the Play Store from your phone/tablet and search for CHARGE Anywhere. |
| | | | |
| − | '''2. Enter the Software License Key and Phone Number provided in your CHARGE Anywhere Welcome Email or Text Message.''' | + | '''2. Enter the Software License Key and Phone Number.''' |
| | + | *Software License Key and Phone Number are provided in your CHARGE Anywhere Welcome Email or Text Message. |
| | | | |
| | '''3. Create a password and sign in with the default username, Owner''' | | '''3. Create a password and sign in with the default username, Owner''' |
| Line 41: |
Line 46: |
| | '''4. To configure a peripheral card reader and/or printer, see [[Peripheral Help]]'''. | | '''4. To configure a peripheral card reader and/or printer, see [[Peripheral Help]]'''. |
| | | | |
| | + | ==<span style="color:#191970">'''Swipe Card for QuickSale'''</span>== |
| | + | If you have a card reader configured, a QuickSale (credit card sale) can be initiated from the home screen by swiping a credit card. For help setting up card reader, see [[Peripheral Help]]. The images below outline the process of a QuickSale. |
| | + | <gallery widths=190px heights=200px perrow=5> |
| | + | File:Androidhomescreen.PNG| '''1. Swipe Card''' |
| | + | File:Androidswipedsale.PNG| '''2. Enter amount and click Submit''' |
| | + | File:Androidapprovedsale.PNG| '''3. The response will display and/or print''' |
| | + | File:Androidsigcap.PNG| '''4. Customer signs screen and presses Submit''' |
| | + | </gallery> |
| | | | |
| − | ''*Below you will find instructions on all of the Mobile Payment App menus.'' | + | <center>''QuickSale instructions''</center> |
| | | | |
| − | ==<span style="color:#191970"><center>Swipe Card for QuickSale</center></span>== | + | ==<span style="color:#191970">'''Transactions'''</span>== |
| | + | The Transactions menu will display a list of tender types: [http://kb.chargeanywhere.com/index.php/Android_Cash <u>'''Cash'''</u>], [http://kb.chargeanywhere.com/index.php/Android_Check <u>'''Check'''</u>], [http://kb.chargeanywhere.com/index.php/Android_Credit <u>'''Credit'''</u>], [http://kb.chargeanywhere.com/index.php/Android_Gift/Loyalty <u>'''Gift/Loyalty'''</u>], and [http://kb.chargeanywhere.com/index.php/Android_ACH/eCheck <u>'''ACH/eCheck'''</u>]. |
| | + | <gallery widths=150px heights=200px perrow=5> |
| | + | File:Androidcashsale.PNG| <center>[http://kb.chargeanywhere.com/index.php/Android_Cash <u>'''Cash'''</u>]</center> |
| | + | File:Androidchecksale.PNG| <center>[http://kb.chargeanywhere.com/index.php/Android_Check <u>'''Check'''</u>]</center> |
| | + | File:Androidcreditsale.PNG| <center>[http://kb.chargeanywhere.com/index.php/Android_Credit <u>'''Credit'''</u>]</center> |
| | + | File:Androidcharge.PNG| <center>[http://kb.chargeanywhere.com/index.php/Android_Gift/Loyalty <u>'''Gift/Loyalty'''</u>]</center> |
| | + | File:AndroidACHsale.PNG|<center>[http://kb.chargeanywhere.com/index.php/Android_ACH/eCheck <u>'''ACH/eCheck'''</u>]</center> |
| | + | </gallery> |
| | | | |
| − | If you have a peripheral card reader configured in our app, a QuickSale (Credit Sale) can quickly be initiated from the main screen by swiping a credit card. For help setting up a peripheral card reader, see [[Peripheral Help]].
| + | <center>''*Click the link below an image for more info on processing transactions''</center> |
| | | | |
| − | ==<span style="color:#191970"><center>Transactions</center></span>== | + | ==<span style="color:#191970">'''Reports'''</span>== |
| − | The Transactions menu will display a list of all tender types. The table below includes a description and instructions to process a transaction for a specific tender type.
| + | [[File:Androidreports.PNG|thumb|left|100px|'''Reports''']] |
| | | | |
| − | ===Cash===
| |
| | | | |
| − | You can record your cash sales and refunds within the mobile payment app. The transaction details are accessible within your Transaction Logs for 4 days. If you are signed up for the cash services with CHARGE Anywhere, the transactions are accessible for 48 months via the online Transaction Manager.
| + | Reports will provide real time totals of transactions run within your Mobile Payment App during the current day. There are a few options to narrow the results of your report. |
| | | | |
| − | ===Check===
| + | <center>'''<u>Report Options</u>'''</center> |
| | | | |
| − | You can record your check sales within the mobile payment app. The transaction details are accessible within your Transaction Logs for 4 days. If you are signed up for the cash services with CHARGE Anywhere, the transactions are accessible for 48 months via the online Transaction Manager. (Only ACH/eCheck transactions will initiate transferral of funds, therefore Check transactions will be listed under the Cash tab in Transaction Manager.)
| + | *'''Tender Types Filter:''' ACH, Cash, Check, Credit, Gift/Loyalty. You may also filter your credit card search by card type. |
| | | | |
| − | ===Credit===
| + | *'''Detail Level:''' ''Short'' will display the transactions that make up the total; ''Full'' includes the timestamp of each transaction. |
| | | | |
| − | You can process both swiped and keyed transactions within the mobile payment app. (To swipe transactions, a compatible card reader will be need to be configured. See [[Peripheral Help]]
| + | *'''Clerk# Filter:''' View totals run by a specific user by entering the user's clerk #. |
| | | | |
| − | *'''Sale''' - You can swipe a card to have the card information populate in the Sale screen or manually key the card information. Enter the transaction amount and press Submit. The transaction will process within 3-5 seconds and display or print the transaction response. All approved sales are automatically batched by CHARGE Anywhere at the end of the business day and sent to your processor for funding. ''(Tip: A swiped Credit Sale can easily be initiated by swiping on the main screen of the app)''
| |
| | | | |
| − | *'''Auth Only''' - An auth only transaction will only issue a hold on the customer's card until it is forced (captured). Only when it is forced, will you be funded for the transaction. You can swipe a card to have the card information populate in the Auth Only screen or manually key the card information. The transaction will process within 3-5 seconds and display or print the transaction response. If approved, the approval code will be needed to perform a manual Force (capture). "Auth Only" transactions are stored within the ''Logs'' of the app for an easy Force. (See instructions for ''Force'' below)
| |
| | | | |
| − | *'''Force (Capture)''' - A force will claim a pending authorization from a previously processed ''Auth Only'' or Voice Authorized transaction. You will need the approval code issued during that transaction in order to manually force. Swipe a card to have the card information populate in the Force screen or manually key the card information and input the associated approval code. The transaction will process within 3-5 seconds and display or print the transaction response. ''(Tip: If the previous Auth Only was run from the mobile app, it can be easily forced via Logs > Auth Only Transactions.)''
| |
| | | | |
| − | *'''Return''' - A return will initiate a credit to a customer's credit card. You can swipe a card to have the card information populate in the Sale screen or manually key the card information. Enter the transaction amount and press Submit. The transaction will process within 3-5 seconds and display or print the transaction response.
| + | ==<span style="color:#191970">'''Logs'''</span>== |
| | + | [[File:Androidcurrentdaylogs.PNG|thumb|right|180px|'''Current Day Logs''' (select a trans)]] |
| | + | [[File:Androidlogoptions.PNG|thumb|right|180px|'''Transaction View''' (click Menu button to void or print trans)]] |
| | | | |
| − | *'''Void''' - Enter the Transaction ID you wish to void. A transaction can only be voided if the batch has not been closed yet (generally the same day of the transaction). Voiding a transaction will remove the transaction from the batch. Depending on the processor and the bank, a hold may remain on the customer's card for a few business days before the hold is released. ''(Tip: A transaction can also be voided via Logs > Current Day Logs.)''
| + | The Logs hold lists of transactions previously entered into the app and provides additional functions for that transaction, such as Reprint Receipt. ''(Screenshots to the right outline the process or reprinting or voiding a transaction)'' |
| | | | |
| − | ===Gift/Loyalty===
| + | <center><u>'''Current Day Logs'''</u></center> |
| − | Gift/ Loyalty allows you to maintain a database of privately labeled cards to disperse to current and/or potential customers. Gift/Loyalty cards dispersed in this manner can then be used as a form of payment with your company. Database management of your privately labeled cards is maintained online, but the mobile payment app allows you to perform transactions on those cards.
| |
| | | | |
| − | *'''Charge''' - A charge allows you to debit the customer’s gift/loyalty card, leaving the customer with a lower available balance. You can swipe a card to have the card number populate in the Charge screen or manually key the card information. Enter the transaction amount and press Submit. The transaction will process within 3-5 seconds and display or print the transaction response.
| + | Displays approved transactions run within the current day. Click a transaction to view the transaction details. |
| | | | |
| − | *'''Refund''' - A refund will initiate a credit to a customer's gift/loyalty card. You can swipe a card to have the card information populate in the Refund screen or manually key the card number. Enter the transaction amount and press Submit. The transaction will process within 3-5 seconds and display or print the transaction response. | + | *Void - While viewing a transaction's details, click the Menu button for the option to void. |
| | | | |
| − | *'''Balance Inquiry''' – A balance inquiry allows you to check the available balance on a card. Swipe or key the gift/loyalty card and press Submit. The available balance will display or print. | + | *Reprint Receipt - While viewing a transaction's details, click the Menu button for options to print Merchant Copy or Customer Copy. A printer must be connected in order for this option to appear. |
| | | | |
| − | *'''Activate''' – Activating a gift/loyalty card allows that card to be used for transactions going forward. You can swipe a card to have the card number populate in the Activate screen or manually key the card number. The amount entered will be the card’s starting value.
| |
| | | | |
| − | *'''Add Value''' – Add value allows you to increase the available balance on an gift/loyalty card. You can swipe a card to have the card number populate in the Add Value screen or manually key the card number. The amount entered will be added to the balance already available on the card.
| + | <center><u>'''Archives'''</u></center> |
| | | | |
| − | *'''Deactivate''' – Deactivating a gift/loyalty card stops transactions from being processed on that card going forward. You can swipe a card to have the card number populate in the Deactivate screen or manually key the card number. Press Submit to deactivate.
| + | There are three archives. After every day, transactions are transferred from Current Day Logs to Archive 1, then Archive 2, then Archive 3, and finally removed from the app's memory. Any transaction record after this will need to be accessed via the online Transaction Manager. Click a transaction within the Archives to view the transaction details. |
| | | | |
| − | ===ACH/eCheck===
| + | <center><u>'''Offline Transactions'''</u></center> |
| − | An ACH/echeck transaction will initiate an Electronic Funds Transfer (EFT). Within the mobile payment app, you have the ability to initate an ACH Sale or Check Conversion (eCheck). Both transactions are generally the same, but Check Conversion allows you to enter a check number and take a picture of the check for digital storage. To process an ACH sale or Check Conversion transaction, enter transaction info into all applicable fields and press Submit. The transaction will process within 3-5 seconds and display or print the transaction response.
| |
| | | | |
| − | ==<span style="color:#191970"><center>Reports</center></span>==
| + | When transactions are entered into the Mobile Payment App while in an Offline Mode, those transactions are stored within this log. Click any transaction to view the transaction details. When Offline Mode has been disabled, you have the ability to send those transactions for live approval. |
| | | | |
| − | Reports will provide real time totals of transactions run within your Mobile Payment App today. Click Report Options to narrow your results by transaction type, card type, report type, and Clerk #.
| + | *Send All - If Offline Mode has been disabled, click the Menu button for an option to Send All. The app will send all Offline Transactions and display the number approved, declined, and failed. If the transaction failed to transmit it will be stored in Failed Offline Transactions. |
| | | | |
| − | ==<span style="color:#191970"><center>Logs</center></span>==
| + | *Void or Send Individual Transaction - While viewing the transaction details, click the Menu button for options to Void or Send Transaction. Void will remove the transaction from Offline logs so that it cannot be uploaded for approval. Send Transaction will only be visible if Offline Mode has been disabled. |
| − | The Logs hold lists of transactions previously entered into the app. The table below describes the information held in each log and the actions that can be performed by a user.
| |
| | | | |
| − | ===Current Day Logs===
| |
| − | Displays approved transactions run within the current day. Click a transaction to view the transaction details.
| |
| | | | |
| − | *'''Void''' - While viewing a transaction's details, press the menu button on your Android phone/tablet for the option to void.
| + | <center><u>'''Failed Offline Transactions'''</u></center> |
| | | | |
| − | *'''Reprint Receipt''' - While viewing a transaction's details, press the menu button on your Android phone/tablet for options to print Merchant Copy or Customer Copy. A peripheral printer must be configured in order for this option to appear.
| + | Stores transactions that failed to upload from Offline Transactions Log. Ensure that Offline Mode is disabled and that you have sufficient data coverage before attempting to resend. Click the Menu button for the option to 'Resend Failed'. |
| | | | |
| − | ===Archives===
| |
| − | There are three archives. After every day, transactions are transferred from Current Day Logs to Archive 1, then Archive 2, then Archive 3, and finally removed from the app's memory. Any transaction record after this will need to be accessed via the online Transaction Manager. Click a transaction within the Archives to view the transaction details.
| |
| − |
| |
| − | ===Offline Transactions===
| |
| − | When transactions are entered into the Mobile Payment App while in an Offline Mode, those transactions are stored within this log. Click any transaction to view the transaction details. When Offline Mode has been disabled, you have the ability to send those transactions for live approval.
| |
| − |
| |
| − | *'''Send All''' - If Offline Mode has been disabled, click the menu button on your Android phone/tablet to receive an option to Send All transactions for live approval. The app will send all Offline Transactions and display the number approved, declined, and failed. If the transaction failed to transmit it will be stored in Failed Offline Transactions.
| |
| − |
| |
| − | *'''Void''' or '''Send Individual Transaction''' - While viewing the transaction details, click the menu button on your Android phone/tablet for options to Void or Send Transaction. Void will remove the transaction from Offline logs so that it cannot be uploaded for approval. Send Transaction will only be visible if Offline Mode has been disabled.
| |
| | | | |
| − | ===Failed Offline Transactions===
| + | <center><u>'''Auth Only Logs'''</u></center> |
| − | Stores transactions that failed to upload from Offline Transactions Log. Ensure that Offline Mode is disabled and that you have sufficient data coverage before attempting to resend. Click your menu button for the option to 'Resend Failed'.
| |
| | | | |
| − | ===Auth Only Logs===
| |
| | All Auth Only transactions that were processed through the Mobile Payment App will be located within this log. Click a transaction to view the transaction details. | | All Auth Only transactions that were processed through the Mobile Payment App will be located within this log. Click a transaction to view the transaction details. |
| | | | |
| − | *'''Capture All''' (Force) - Click the menu button on your Android phone/tablet to receive an option to Capture All. The app will send all Auth Only transactions and display the number approved, declined, and failed. | + | *Capture All (Force) - Click the Menu button for an option to Capture All. The app will send all Auth Only transactions and display the number approved, declined, and failed. |
| − | *'''Capture Transaction''' or '''Delete Transaction''' - While viewing the transaction details, click the menu button on your Android phone/tablet for options to Capture Transaction or Delete Transaction. | + | *Capture Transaction or Delete Transaction - While viewing the transaction details, click the Menu button for options to Capture Transaction or Delete Transaction. |
| − | | |
| − | | |
| − | ==<span style="color:#191970"><center>Config</center></span>==
| |
| − | The Config menu holds various options that control the default behaviour of the mobile payment. It includes '''<u>Feature Options</u>''', '''<u>Setup</u>''', <u>'''Security'''</u>, <u>'''Support'''</u> and '''<u>Maintenance</u>'''.
| |
| − | | |
| − | ===<span style="color:#191970"><u>'''Feature Options'''</u></span>===
| |
| − | '''Add Features/Options''' - Allows you to purchase compatible hardware and unlock different services within the Mobile Payment App. Please note, to process Credit Card or ACH/eCheck transactions, a credit card processor and ACH processor is required respectively. The app will request the specifics of your processor account before a transaction can be run.
| |
| − | | |
| − | '''Get Hardware''' - Allows you to purchase compatible swipers and/or printers.
| |
| − | | |
| − | '''Refresh Services''' - If a merchant service provider or CHARGE Anywhere Customer Support has activated services on your behalf after you have registered your app, click Refresh Services to have the app updated with the change.
| |
| − | | |
| − | ===<span style="color:#191970"><u>'''Setup'''</u></span>===
| |
| − | | |
| − | ====<center><u>Optional Prompts</u></center>====
| |
| − | | |
| − | '''Clerk# Prompt''' - A clerk # is used to identify which user has processed a transaction. Once a username has been assigned a clerk#, every transaction submitted by that user will include the clerk#.
| |
| − | *<u>Clerk# Text:</u> The clerk# can be labeled as Driver#, Operator#, Employee#, Vendor#, Server ID, Bartender ID, Waiter ID
| |
| − | *<u>Clerk#:</u> If a username was not assigned a clerk #, this field will be used as a default clerk#.
| |
| − | '''Enable QuickBooks Integration''' - If enabled, either customer# or invoice# will be a required field in order to process a transaction. If you have CHARGE Anywhere® Designed for Use with QuickBooks active on your gateway account, the transactions can be imported into QuickBooks to automatically create payment records. For more detail info, see [[QB Integration]].
| |
| − | | |
| − | '''Tax Prompt''' - If enabled, the mobile payment app will apply a designated tax % to every transaction amount. If you leave the tax % blank, you will have a chance to manually enter a tax amount at the time of sale.
| |
| − | | |
| − | '''Tip Prompt''' - If enabled, you will have the option to include a tip amount when processing a transaction.
| |
| − | *<u>Tip Mode:</u> ''Prompt Amount'' allows you to manually enter a dollar amount; ''Prompt Percent'' will allow you to manually enter a % of the transaction amount; ''Pick %'' allows you to choose from a list of tip % during the time of transaction; ''Auto Apply %'' will automatically add a designated %.
| |
| − | *<u>Tip Receipt:</u> Prints a reciept with the amount of the transaction so that the customer may include tip amount on the receipt. You may then enter the tip amount so that the grand total may be authorized.
| |
| − | | |
| − | ====<center><u>Transaction Settings</u></center>====
| |
| − | '''Enable Signature''' - Prompts for the customer's signature after an approved credit card transaction.
| |
| − | | |
| − | '''Retry Attempts''' - Will try to resubmit a transaction if there was no response from server.
| |
| − | | |
| − | '''No Response Action''' - If a submitted transaction receives no response from server, you may choose to have that the app "Ask to Store Offline" or "Auto Store Offline".
| |
| − | | |
| − | '''Enable Offline''' - If enabled, all transactions entered will not be submitted for authorization, but will be stored securely within your phone. When offline mode is disabled, you may submit those transactions for authorization from the ''Offline Transactions Logs''. '''WARNING:''' The merchant assumes all risk for any transaction that are declined and/or rejected for any reason when submitted for approval.
| |
| − | | |
| − | '''Default Amount''' - Any amount entered here will automatically display as the transaction amount when beginning a transaction.
| |
| − | *<u>Quantity Prompt</u> - If you choose a default amount, the quantity prompt can be used as a multiplier.
| |
| − | | |
| − | '''Purchase Cards Enabled''' - Allows you to accept Level 2 cards. A Level 2 card is government or business issued credit card. The customer will need to provide a purchase code.
| |
| − | | |
| − | '''Externals Enabled''' -
| |
| − | | |
| − | '''Swipe Option:''' Determines what track is read when a credit card is swiped.
| |
| − | | |
| − | '''Show Subtotal:''' Displays the subtotal of transaction amount and tax amount.
| |
| − | | |
| − | ====<center><u>Peripheral Devices</u></center>====
| |
| − | Used to pair compatible printers and swipers with the app. For additional info, see [[Peripheral Help]].
| |
| − | | |
| − | ====<center><u>Receipt Options</u></center>====
| |
| − | '''View/Edit Header''' - Displays at the top of a receipt.
| |
| − | | |
| − | '''View/Edit Footer''' - Displays at the bottom of a receipt.
| |
| − | | |
| − | '''Print Options''' - Pick whether "Customer Copy", "Merchant Copy", both or no receipt should be automatically printed upon an approved and/or declined transaction.
| |
| − | | |
| − | '''Email Options''' - Sets the behaviour of emailed receipts.
| |
| − | *<u>Email Customer Receipt:</u> If enabled, a prompt for the customer's email address will appear after an approved transaction.
| |
| − | *<u>Default From Email:</u> The email address that the customer will see when the reciept is emailed.
| |
| − | *<u>Default Subject Text:</u> The subject of the receipt email.
| |
| − | *<u>Email Method:</u> The receipt email can be sent via your phone/tablet or a CHARGE Anywhere server.
| |
| − | | |
| − | ====<center><u>Advanced</u></center>====
| |
| − | '''Network Settings''' - The app will always be in Production. This cannot be changed.
| |
| − | | |
| − | '''Application Mode''' - The app can be placed in a Demo Mode, Testing Mode, or Debug Mode. Transactions will not be be submitted for authorization when utilizing one of these modes. '''WARNING:''' CHARGE Anywhere highly discourages changing the application mode.
| |
| − | | |
| − | '''Config Tender Types''' - Controls the display of Transaction's tender type.
| |
| − | | |
| − | '''GPS''' - If enabled, the GPS location of the transaction's origin will be digitally stored.
| |
| − | | |
| − | '''Processor Info''' - Allows you to change the specifications of your processor info.
| |
| − | | |
| − | ===<span style="color:#191970"><u>'''Security'''</u></span>===
| |
| − | | |
| − | ====<center><u>Fraud Control</u></center>====
| |
| − | '''Enter Last 4 Digits''' - Requires the last 4 digits to be manually entered by the clerk when a credit card is swiped. (This essentially forces the clerk to view all credit cards)
| |
| − | | |
| − | '''Name/Card#''' - Choose whether you would like the credit card information shown on the screen, hidden, or truncated when a credit card is swiped.
| |
| − | | |
| − | '''Card Present''' - You may have the app always ask if the card is present, ask during keyed transactions, or not ask. (Card Present may qualify you for a better rate with your processor, but should only be selected if the card is physically in front of you at the time of the transaction)
| |
| − | | |
| − | '''AVS''' (Address Verification System) - You may have the app always ask for the billing address and zip code of the credit card, ask during keyed transactions, ask if card not present, or not ask.
| |
| − | | |
| − | '''CVV''' (Card Verification Value) - You may have the app ask for the CVV during keyed transactions, ask if card not present, or not ask.
| |
| − | | |
| − | ====<center><u>User Management</u></center>====
| |
| − | '''Add User''' - Creates a new username
| |
| − | #Create a username.
| |
| − | #Create a password and confirm. ''(Password Policy below)''
| |
| − | #Assign a Clerk # and edit permissions. (optional)
| |
| − | #Click Save.
| |
| − | | |
| − | '''Edit User''' - Change the password, clerk#, and/or permissions of an existing username.
| |
| − | | |
| − | '''Delete User''' - Removes access of a specific username.
| |
| − | | |
| − | <u>'''Password Policy:'''</u>
| |
| − | * Password has to be at least 8 alphanumerics
| |
| − | * Password must have digits
| |
| − | * Password must have both upper and lower case letters
| |
| − | * Username cannot be a part of the password.
| |
| − | | |
| − | ====<center><u>Halo</u></center>====
| |
| − | Sets a limit on the total Sales and Returns allowed within a day.
| |
| − | | |
| − | ===<span style="color:#191970"><u>'''Support'''</u></span>===
| |
| − | | |
| − | {| class="wikitable"
| |
| − | |-
| |
| − | ! Menu Option
| |
| − | ! Description
| |
| − | |-style="color: black; background-color: #F0FFFF;"
| |
| − | |<center>'''Supported Processors'''</center>
| |
| − | | Displays a list of processors that can be used with the Mobile Payment App.
| |
| − | |-style="color: black; background-color: #F8F8FF;"
| |
| − | |<center>'''Help Desk Info'''</center>
| |
| − | |You may store your Customer Support contacts.
| |
| − | |-style="color: black; background-color: #F0FFFF;"
| |
| − | |<center>'''Card Type Info'''</center>
| |
| − | |Visa/MasterCard: (800)-944-1111
| |
| − | | |
| − | American Express: (800)-528-2121
| |
| − | | |
| − | Discover: (800)-347-1111
| |
| − | | |
| − | Diners Club: (800)-525-9040
| |
| − | |-style="color: black; background-color: #F8F8FF;"
| |
| − | |<center>'''FAQ'''</center>
| |
| − | |Frequently Asked Questions & Answers
| |
| − | |-style="color: black; background-color: #F0FFFF;"
| |
| − | |<center>'''Send Log'''</center>
| |
| − | |Sends error logs to CHARGE Anywhere Customer Support.
| |
| − | |-style="color: black; background-color: #F8F8FF;"
| |
| − | |<center>'''About'''</center>
| |
| − | |Displays the Mobile Payment App's version #, your customer ID, SDK #, and your phone model.
| |
| − | | |
| − | '''Current Version: 2.0.0.21'''
| |
| − | |}
| |
| − | | |
| − | ===<span style="color:#191970"><u>'''Maintenance'''</u></span>===
| |
| − | | |
| − | {| class="wikitable"
| |
| − | |-
| |
| − | ! Menu Option
| |
| − | ! Description
| |
| − | |-style="color: black; background-color: #F0FFFF;"
| |
| − | |<center>'''Rotate Keys'''</center>
| |
| − | | Changes the encryption key for security. It is recommended to rotate keys annually.
| |
| − | |-style="color: black; background-color: #F8F8FF;"
| |
| − | |<center>'''Rotate Logs'''</center>
| |
| − | | Transfers your current day log to Archive 1, Archive 1 to Archive 2, and so on. (This process takes place automatically at the start of a new day.)
| |
| − | |-style="color: black; background-color: #F0FFFF;"
| |
| − | |<center>'''Unregister'''</center>
| |
| − | | Unregisters your software license key. (Recommended before transferring app to another phone/tablet)
| |
| − | |-style="color: black; background-color: #F8F8FF;"
| |
| − | |<center>'''Review Trace'''</center>
| |
| − | | Shows the maintenance logs for the app.
| |
| − | |-style="color: black; background-color: #F0FFFF;"
| |
| − | |<center>'''Review Login Trace'''</center>
| |
| − | | Shows the maintenance logs for the currently signed in user.
| |
| − | |-style="color: black; background-color: #F8F8FF;"
| |
| − | |<center>'''View GPS Data'''</center>
| |
| − | | Displays your current GPS location.
| |
| − | |-style="color: black; background-color: #F0FFFF;"
| |
| − | |<center>'''Pending Uploads'''</center>
| |
| − | | Cash and Check transactions are not submitted to the gateway at the exact time of the transaction, but is periodically sent to the gateway. Pending uploads displays all cash and check transactions that have not been sent to the gateway yet.
| |
| − | |}
| |
| − | | |
| − | ==Demo Videos==
| |
| − | <div align="center">
| |
| − | <center>'''Installation Demo'''</center>
| |
| − | | |
| − | video coming
| |
| − | | |
| − | | |
| − | <center>'''Configuring peripheral printer/card reader'''</center>
| |
| − | *<mediaplayer>http://kb.chargeanywhere.com/img_auth.php/f/f2/PairingBluetooth_final_w_audio.flv</mediaplayer></center>
| |
| | | | |
| − | <center>'''Processing a QuickSale'''</center> | + | ==<span style="color:#191970">'''Config'''</span>== |
| − | *<mediaplayer>http://http://kb.chargeanywhere.com/img_auth.php/9/93/QuickSale_w_TransactionManager2_final_w_audio.flv</mediaplayer>
| + | Config will display a list of menu options: [http://kb.chargeanywhere.com/index.php/Android_Feature_Options '''Feature Options'''], [http://kb.chargeanywhere.com/index.php/Android_Setup <u>'''Setup'''</u>], [http://kb.chargeanywhere.com/index.php/Android_Security '''Security'''], [http://kb.chargeanywhere.com/index.php/Android_Support '''Support'''], and [http://kb.chargeanywhere.com/index.php/Android_Maintenance '''Maintenance''']. |
| − | </div> | + | <gallery widths=150px heights=200px perrow=5> |
| | + | File:Androidfeatureoptions.PNG| <center>[http://kb.chargeanywhere.com/index.php/Android_Feature_Options '''Feature Options''']</center> |
| | + | File:Androidsetup.PNG|<center>[http://kb.chargeanywhere.com/index.php/Android_Setup <u>'''Setup'''</u>]</center> |
| | + | File:Androidsecurity.PNG| <center>[http://kb.chargeanywhere.com/index.php/Android_Security '''Security''']</center> |
| | + | File:Androidsupport.PNG| <center>[http://kb.chargeanywhere.com/index.php/Android_Support '''Support''']</center> |
| | + | File:Androidmaintenance.PNG|<center>[http://kb.chargeanywhere.com/index.php/Android_Maintenance '''Maintenance''']</center> |
| | + | </gallery> |
| | + | <center>''*Click the link below an image for more info on the menu options''</center> |
| | | | |
| − | ==FAQ== | + | =='''Demos & FAQ'''== |
Welcome to the CHARGE Anywhere® Mobile Payment App Knowledge Base!
Mobile Payment App is available for Android, Apple iOS, BlackBerry, J2ME, and Windows Mobile operating systems.
Overview
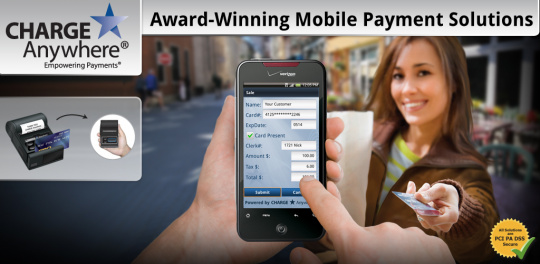
CHARGE Anywhere®'s Mobile Payment App for Android is the industry's most complete mobile payment solution. CHARGE Anywhere's award winning Mobile Payment Solution gives merchants the ability to process transactions securely from their smartphone or tablet. The app offers the ability to accept multiple tender types: Credit Card, Cash, Check, Gift/loyalty, and ACH/eCheck. Included with the solution is our PA DSS Payment Gateway, ComsGate Transaction Manager and a Free Virtual Terminal.
Available for: Android, Apple iOS, BlackBerry, J2ME, and Windows Mobile operating systems.
System Requirements: Internet Connectivity is required to transmit transaction data.
Android: OS 2.0 or higher
Apple iOS: OS 3.1 or higher
BlackBerry: OS 4.5 or higher
J2ME: CLDC 1.1 and MIDP 2.0
Windows Mobile: OS 5.0-6.5
Supported Peripherals: See Peripheral Help
Features: Free Online Transaction Manager & Virtual Terminal, Electronic Signature Capture, Record of transaction location (GPS), Offline Mode (Store and Forward), AVS & CVV2, Level 1 & Level 2 Purchase Cards, Optional Prompts (tips, clerk#, tax%, customer#)
Add On Features: Bill Presentment; Recurring Database
A Credit Card Merchant Account and ACH Merchant Account is required to process credit card payments and ACH transactions respectively. CHARGE Anywhere does not provide Merchant Accounts but is compatible with all major Payment Processors in the US & Canada.
Getting Started
1. Download the CHARGE Anywhere Payment App from the Google Play Store.
2. Enter the Software License Key and Phone Number.
- Software License Key and Phone Number are provided in your CHARGE Anywhere Welcome Email or Text Message.
3. Create a password and sign in with the default username, Owner
4. To configure a peripheral card reader and/or printer, see Peripheral Help.
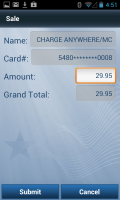
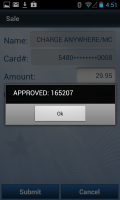
Swipe Card for QuickSale
If you have a card reader configured, a QuickSale (credit card sale) can be initiated from the home screen by swiping a credit card. For help setting up card reader, see Peripheral Help. The images below outline the process of a QuickSale.
2. Enter amount and click Submit
3. The response will display and/or print
4. Customer signs screen and presses Submit
QuickSale instructions
Transactions
The Transactions menu will display a list of tender types: Cash, Check, Credit, Gift/Loyalty, and ACH/eCheck.
*Click the link below an image for more info on processing transactions
Reports
Reports will provide real time totals of transactions run within your Mobile Payment App during the current day. There are a few options to narrow the results of your report.
Report Options
- Tender Types Filter: ACH, Cash, Check, Credit, Gift/Loyalty. You may also filter your credit card search by card type.
- Detail Level: Short will display the transactions that make up the total; Full includes the timestamp of each transaction.
- Clerk# Filter: View totals run by a specific user by entering the user's clerk #.
Logs
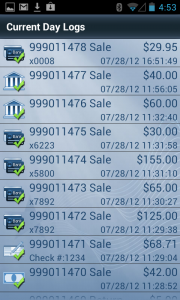
Current Day Logs (select a trans)
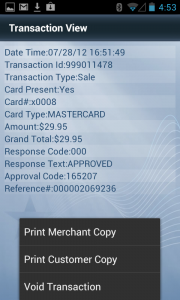
Transaction View (click Menu button to void or print trans)
The Logs hold lists of transactions previously entered into the app and provides additional functions for that transaction, such as Reprint Receipt. (Screenshots to the right outline the process or reprinting or voiding a transaction)
Current Day Logs
Displays approved transactions run within the current day. Click a transaction to view the transaction details.
- Void - While viewing a transaction's details, click the Menu button for the option to void.
- Reprint Receipt - While viewing a transaction's details, click the Menu button for options to print Merchant Copy or Customer Copy. A printer must be connected in order for this option to appear.
Archives
There are three archives. After every day, transactions are transferred from Current Day Logs to Archive 1, then Archive 2, then Archive 3, and finally removed from the app's memory. Any transaction record after this will need to be accessed via the online Transaction Manager. Click a transaction within the Archives to view the transaction details.
Offline Transactions
When transactions are entered into the Mobile Payment App while in an Offline Mode, those transactions are stored within this log. Click any transaction to view the transaction details. When Offline Mode has been disabled, you have the ability to send those transactions for live approval.
- Send All - If Offline Mode has been disabled, click the Menu button for an option to Send All. The app will send all Offline Transactions and display the number approved, declined, and failed. If the transaction failed to transmit it will be stored in Failed Offline Transactions.
- Void or Send Individual Transaction - While viewing the transaction details, click the Menu button for options to Void or Send Transaction. Void will remove the transaction from Offline logs so that it cannot be uploaded for approval. Send Transaction will only be visible if Offline Mode has been disabled.
Failed Offline Transactions
Stores transactions that failed to upload from Offline Transactions Log. Ensure that Offline Mode is disabled and that you have sufficient data coverage before attempting to resend. Click the Menu button for the option to 'Resend Failed'.
Auth Only Logs
All Auth Only transactions that were processed through the Mobile Payment App will be located within this log. Click a transaction to view the transaction details.
- Capture All (Force) - Click the Menu button for an option to Capture All. The app will send all Auth Only transactions and display the number approved, declined, and failed.
- Capture Transaction or Delete Transaction - While viewing the transaction details, click the Menu button for options to Capture Transaction or Delete Transaction.
Config
Config will display a list of menu options: Feature Options, Setup, Security, Support, and Maintenance.
*Click the link below an image for more info on the menu options
Demos & FAQ