Difference between revisions of "Quicksale POS-QSR"
(→Logs) |
(→Logs) |
||
| Line 316: | Line 316: | ||
'''<span style="color:#191970">To hold an order:''' | '''<span style="color:#191970">To hold an order:''' | ||
| − | <span style="color:black"> | + | <span style="color:black">*Select the product(s) you wish to sell from the product selection panel or scan the product(s) barcode. Change quantities and apply promos and/or discounts as necessary. |
| − | *Select the product(s) you wish to sell from the product selection panel or scan the product(s) barcode. Change quantities and apply promos and/or discounts as necessary. | ||
*Select Hold Order | *Select Hold Order | ||
*Enter a name for the order | *Enter a name for the order | ||
Revision as of 08:15, 15 August 2019

Quicksale & Miura M010 Wireless EMV video
Setup Guide - Click link to download a video guide to configuring the QuickSale POS-QSR Online Portal
QuickSale Cash Register POS-QSR is a dynamic cloud-based cash register and retail management system that provides the latest in point-of-sale functionality and business management tools.
Our cutting-edge features are designed to give business owners a competitive advantage, and our tablet application, powered by the cloud-based back end that is multi-user and multi-location friendly, allows for convenient management from anywhere with internet connectivity.
System Requirements: Android OS 6.0 or higher; Internet Connectivity is required to transmit transaction data.
Supported Peripherals: See Peripheral Help
Features: Free Online Transaction Manager & Virtual Terminal, Electronic Signature Capture, Record of transaction location (GPS), AVS & CVV2, Level 1 & Level 2 Purchase Cards, Optional Prompts (tips, clerk#, tax%, customer#)
A Credit Card Merchant Account and ACH Merchant Account is required to process credit card payments and ACH transactions respectively. CHARGE Anywhere does not provide Merchant Accounts but is compatible with all major Payment Processors in the US & Canada.
Getting Started

1. Download the QuickSale™ Cash Register for Android app from the Google Play Store.
- Click the following link to obtain the download: https://play.google.com/store/apps/details?id=com.chargeanywhere.cashregister
- or go to the Play Store from your phone/tablet and search for CHARGE Anywhere Cash Register.
- Current Release version 1.5.0.27
2. Enter the Software License Key and Phone Number.
- Software License Key and Phone Number are provided in your CHARGE Anywhere Welcome Email or Text Message.
3. Sign in with the username and password that were created in the Cash Register Portal.
4. To configure a peripheral card reader and/or printer, see Peripheral Help.
Process Sale
Enter the items that will be sold in the transaction. The total sale amount will be displayed in the Total section above the Sale Item window. The Subtotal section at the bottom will show the breakdown of the sale, included Taxes, and deductions from Discounts.

You can tap on Exact Change button to complete a cash transaction for the exact total amount.
Press the Payment button when you are ready to collect payment and select one of the following options:
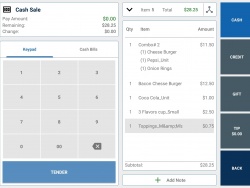
1. For a cash payment press the cash button on the right hand side. You can manually type in the amount or press the Tender button to enter the full amount
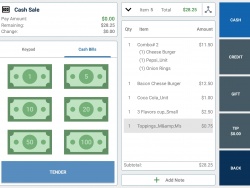
2. You can also use the Cash Bills option to enter the amount

3. For a check payment press the check button on the right hand side. Here you can enter in the amount and check number
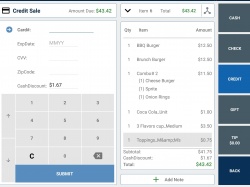
4. For a credit payment press the credit button and then manually enter the card number or swipe/insert the card into your card reader.


After the order is completed you will be prompted to:
- Signature capture: After an approved credit card sale, the customer will be prompted to sign on the screen (Signature capture must be enable in the portal)
- Print receipt: If you have a receipt printer connected, receipt will automatically print (Print receipts options are configured in the portal)
- Email receipt: You will be prompted to enter the customer’s email address (Email Customer Receipt must be enabled in the Portal).
Transaction Options
The Transaction options are displayed on the right side of the Sale Window.

To add a customer:
- Select Customer walk-in from the cashier options
- Tap on New customer
- Enter the customers first name, last name, phone number and email address
- Tap ok:
- The added customer will automatically be assigned to the next order.
- The customer number will automatically be assigned by the Portal after added.
To assign a customer to an order:
- Select Customer walk-in from the Cashier Options.
- Locate and select desired customer. (You can search for customers by their customer number, first name, last name, phone number or email address.) then tap on Set customer
- Once a customer is selected, you will see the customer’s last name under the Customer button in Cashier Options.
- If the customer has been assigned a customer discount in Portal, the customer discount will automatically be applied to the entire order.

To hold an order:
- Select the product(s) you wish to sell from the product selection panel or scan the product(s) barcode. Change quantities and apply promos and/or discounts as necessary.
- Select Hold Order
- Enter a name for the order
- Select Save Order
To retrieve a held order:
- Ensure that there are no items in checkout panel and click Held Orders from the menu bar located on the left hand side upper corner of the screen
- Select the desired order
- Once the order is recalled, you can make any necessary edits to the order or process the payment

To process a refund:
- Tap on the menu icon on the left hand side of the screen, then tap on recent orders, after that select the order, you will have the option to:
- Refund All - While viewing a transaction's details, click the Options button for the option to refund the full amount of the transaction.
- Refund Some - While viewing a transaction's details, click the Options button for the option to refund a selected amount of the transaction.
- Email Customer Copy - While viewing a transaction's details, click the Options button for the option to email the customer a copy of the receipt.
Options

The options menu will allow you configure the application and perform maintenance functions

Tap on New Ordder to start a new order. If you currently have an order and you tap on "New Order" you will get a popup This feature will clear the current order. Would you like to proceed? click ok to go back to the Start order screen.

The Sync Menu will allow you to connect the application to your Cash Register portal to pick up any changes to products or users
- Sync Orders: download and sync the order from the online portal
- Sync Tables: download and sync tables from the online portal
- Sync Customers: download updates to saved customer information from the online portal
- Sync Products: download product updates from the online portal
- Sync Categories: download product categories from the online portal
- Sync Promotions: download promotional discounts from the online portal
- Sync Users: download updates to login permissions from the online portal
- Sync Registers: download and sync the registers from the online portal
- Sync Settings: download application settings from the online portal
- Sync All: Performs all of the Synchronization options in the Sync Menu

Reports will provide real time totals of transactions run within your Cash Register App during the current day. There are a few options to narrow the results of your report.
- Tender Types Filter: ACH, Cash, Check, Credit, Gift/Loyalty. You may also filter your credit card search by card type.
- Detail Level: Short will display the transactions that make up the total; Full includes the timestamp of each transaction.
- Clerk# Filter: View totals run by a specific user by entering the user's clerk #.

Tap on Close Shift whenever you are ready to Close the shift, once you clicked on it you will have the option to print the Z report (End of day report), email Z report or skip it.
Logs

Recent Orders displays approved transactions run within the current day. Click a transaction to view the transaction details and available options.

Once you click on any of the Recent order you will have the following options:
- Refund All - While viewing a transaction's details, click the Options button for the option to refund the full amount of the transaction.
- Refund Some - While viewing a transaction's details, click the Options button for the option to refund a selected amount of the transaction.
- Reprint Receipt - While viewing a transaction's details, click the Options button for options to print Merchant Copy or Customer Copy. A printer must be connected in order for this option to appear.
- Email Customer Copy - While viewing a transaction's details, click the Options button for the option to email the customer a copy of the receipt.
- Map It- While viewing a transaction's details, click the Options button for the option to view the GPS location the transaction took place.

Hold Order allows you to save a sale to be processed at a later time. An order can be held for up to 2 hours, this option will change to Held Order if there are no items currently in the sale
To hold an order:
*Select the product(s) you wish to sell from the product selection panel or scan the product(s) barcode. Change quantities and apply promos and/or discounts as necessary.
- Select Hold Order
- Enter a name for the order
- Select Save Order
To retrieve a held order:
- Ensure that there are no items in checkout panel and click Held Orders from the menu bar
- Select the desired order
- Once the order is recalled, you can make any necessary edits to the order or process the payment
