Difference between revisions of "Batch Transactions"
| Line 7: | Line 7: | ||
'''2.''' Click <u>Import Setup</u> and configure it to match the transaction data listed in your file. | '''2.''' Click <u>Import Setup</u> and configure it to match the transaction data listed in your file. | ||
| − | *Transaction Type, Card Number, Expiration Date and Amount are required. You may select skip for any other field not included in your file | + | *Transaction Type, Card Number, Expiration Date and Amount are required. You may select skip for any other field not included in your file. |
'''3.''' Browse for your file and select "Click to Upload". | '''3.''' Browse for your file and select "Click to Upload". | ||
Revision as of 10:49, 4 April 2014
Most merchants who need to process batch files use a commercially available software that can export payment data in a csv (comma separated values) format. The batch processing import setup uses a flexible mapping scheme that allows the merchant to tell the system in what order the payment data appears in the file. Each line of data in the file represents a single transaction record with commas separating the values. View Specs
To process batch transactions:
1. Go to Virtual Terminal > Batch Transactions.
2. Click Import Setup and configure it to match the transaction data listed in your file.
- Transaction Type, Card Number, Expiration Date and Amount are required. You may select skip for any other field not included in your file.
3. Browse for your file and select "Click to Upload".
4. Verify that all information was imported correctly. If you have multiple devices with CHARGE Anywhere, select which device you want the transactions to be associated with using the Select a Terminal drop-down list.
5. Click "Process Batch". (Wait a few moments for all transactions to be processed and once processed, you will see a list of transaction results.)

Sample Batch File w/ Transaction Data
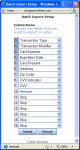
Import Setup (step 2)
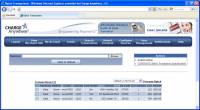
Imported Transaction (step 4)
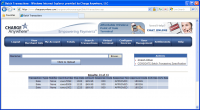
Transaction Responses


