Quicksale POS

Quicksale & Miura M010 Wireless EMV video
Setup Guide - Click link to download a video guide to configuring the QuickSale POS Online Portal
Overview
QuickSale Cash Register POS is a dynamic cloud-based cash register and retail management system that provides the latest in point-of-sale functionality and business management tools.
Our cutting-edge features are designed to give business owners a competitive advantage, and our tablet application, powered by the cloud-based back end that is multi-user and multi-location friendly, allows for convenient management from anywhere with internet connectivity.
System Requirements: Android OS 4.4 or higher; Internet Connectivity is required to transmit transaction data.
Supported Peripherals: See Peripheral Help
Features: Free Online Transaction Manager & Virtual Terminal, Electronic Signature Capture, Record of transaction location (GPS), Offline Mode (Store and Forward), AVS & CVV2, Level 1 & Level 2 Purchase Cards, Optional Prompts (tips, clerk#, tax%, customer#)
A Credit Card Merchant Account and ACH Merchant Account is required to process credit card payments and ACH transactions respectively. CHARGE Anywhere does not provide Merchant Accounts but is compatible with all major Payment Processors in the US & Canada.
Getting Started

1. Download the QuickSale™ Cash Register for Android app from the Google Play Store.
- Click the following link to obtain the download: https://play.google.com/store/apps/details?id=com.chargeanywhere.cashregister
- or go to the Play Store from your phone/tablet and search for CHARGE Anywhere Cash Register.
- Current Release version 1.2.0.3
2. Enter the Software License Key and Phone Number.
- Software License Key and Phone Number are provided in your CHARGE Anywhere Welcome Email or Text Message.
3. Sign in with the username and password that were created in the Cash Register Portal.
4. To configure a peripheral card reader and/or printer, see Peripheral Help.
Process Sale
Enter the items that will be sold in the transaction. The total sale amount will be displayed in the Total section above the Sale Item window. The Subtotal section at the bottom will show the breakdown of the sale, included Taxes, and deductions from Discounts.

You can tap on Exact Change button to complete a cash transaction for the exact total amount.
Press the Payment button when you are ready to collect payment and select one of the following options:
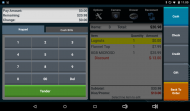
1. For a cash payment press the cash button on the right hand side. You can manually type in the amount or press the Tender button to enter the full amount
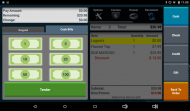
2. You can also use the Cash Bills option to enter the amount
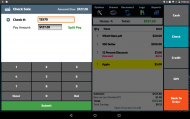
3. For a check payment press the check button on the right hand side. Here you can enter in the amount and check number
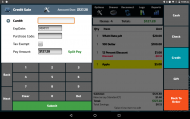
4. For a credit payment press the credit button and then manually enter the card number or swipe/insert the card into your card reader.


After the order is completed you will be prompted to:
- Signature capture: After an approved credit card sale, the customer will be prompted to sign on the screen (Signature capture must be enable in the portal)
- Print receipt: If you have a receipt printer connected, receipt will automatically print (Print receipts options are configured in the portal)
- Email receipt: You will be prompted to enter the customer’s email address (Email Customer Receipt must be enabled in the Portal).
Transaction Options
The Transaction options are displayed on the right side of the Sale Window.
1.Payment allows you to collect payment for the sale. Payment can be taken with Cash, Check, Credit/Debit or Gift Card
2. Quick Cash allows you to collect a cash payment for the exact amount of the sale.
3. Customer allows you to associate a customer to the sale. This can be used to save the customers email address for sending receipts, or to add automatic discounts to a specific customers order
To add a customer:
- Select customers from the cashier options
- Select add new
- Enter the customers first name, last name, phone number and email address
- Tap ok:
- The added customer will automatically be assigned to the next order.
- The customer number will automatically be assigned by the Portal after added.
To assign a customer to an order:
- Select Customers from the Cashier Options.
- Locate and select desired customer. (You can search for customers by their customer number, first name, last name, phone number or email address.)
Tap Ok:
- Once a customer is selected, you will see the customer’s last name under the Customer button in Cashier Options.
- If the customer has been assigned a customer discount in Portal, the customer discount will automatically be applied to the entire order.
4. Promo allows you to add discounts to the current sale, to apply a promo to an entire order, select Promo from the menu bar and enter the promo code. After promo is applied, the discounted amount will appear in the checkout summary in red
5. New Order removes all items from the current sale and starts a new one
6. Hold Order allows you to save a sale to be processed at a later time. An order can be held for up to 2 hours, this option will change to Held Order if there are no items currently in the sale
To hold an order:
- Select the product(s) you wish to sell from the product selection panel or scan the product(s) barcode. Change quantities and apply promos and/or discounts as necessary.
- Select Hold Order
- Enter a name for the order
- Select Save Order
To retrieve a held order:
- Ensure that there are no items in checkout panel and click Held Orders from the menu bar
- Select the desired order
- Once the order is recalled, you can make any necessary edits to the order or process the payment
7. Refund allows to perform a refund using the order number or by scanning the receipt they will have the option to:
- Refund All - While viewing a transaction's details, click the Options button for the option to refund the full amount of the transaction.
- Refund Some - While viewing a transaction's details, click the Options button for the option to refund a selected amount of the transaction.
- Email Customer Copy - While viewing a transaction's details, click the Options button for the option to email the customer a copy of the receipt.
Options

The options menu will allow you configure the application and perform maintenance functions

The Peripheral Device menu will allow you to configure your receipt printer, card swiper/ chip reader, and barcode scanner

The Maintenance Menu can only be used by users with Administrative permissions. You will need to enter a manager authorization code to access.
- Rotate KEK: Resets the encryption key used to generate the Data Encryption Key. This function will be performed automatically annually
- Rotate Keys: Resets the Data Encryption Key used by the application to encrypt card data. This function will be performed automatically annually
- Unregister: Unregisters the software license key so the application can be installed on another tablet
- Update Config Files if you have a chip reader configured, this will download the latest files into the terminal
- Update RKI if you have a chip reader configured, performs a remote key injection to update the encryption key of the device. This should be done after Rotate KEK is used
- EMV Reports: Email reports detailing chip card transactions

The Sync Menu will allow you to connect the application to your Cash Register portal to pick up any changes to products or users
- Sync All: Performs all of the Synchronization options in the Sync Menu
- Sync Device Settings: download application settings from the online portal
- Sync Categories: download product categories from the online portal
- Sync Products: download product updates from the online portal
- Sync Promotions: download promotional discounts from the online portal
- Sync Audio Jack File: download the latest configuration for the Unimag Audio Jack Reader
- Sync User Permissions: download updates to login permissions from the online portal
- Sync Customer Database: download updates to saved customer information from the online portal

The Cash Drop menu is used to record removing bills from the cash drawer

The Cash Buy menu is used to record adding bills to the cash drawer

The Promotions menu is used to review and printout promotional discounts

The Gift/Loyalty Menu will allow you to do a Balance Inquiry on a giftcard. You will need to enter a manager authorization code to access.

The Media Counter is used to add up all the bills and coins in the cash drawer. At the bottom will be a message if the cash drawer is over or below the number of cash sales performed.
Camera

If the tablet the application is running on has a camera the application can use it to scan bar codes that have been generated in the online portal. To scan a bar code press the Camera button on the top menu, then position the rectangle in the center over the bar code. It will turn green when it successfully reads the code and the item will be added to the sale. If the camera scans a bar code that is not associated to any item in the online portal a message will be displayed that the item could not be found
Drawer
The Drawer button will open the cash drawer connected to your application
Reconnect

Pressing the reconnect button will attempt to sync your bluetooth peripherals with the application.
Logs
The Logs hold lists of transactions previously entered into the app and provides additional functions for that transaction, such as Reprint Receipt. (Screenshots to the right outline the process or reprinting or voiding a transaction)
Displays approved transactions run within the current day. Click a transaction to view the transaction details.


- Refund All - While viewing a transaction's details, click the Options button for the option to refund the full amount of the transaction.
- Refund Some - While viewing a transaction's details, click the Options button for the option to refund a selected amount of the transaction.
- Reprint Receipt - While viewing a transaction's details, click the Options button for options to print Merchant Copy or Customer Copy. A printer must be connected in order for this option to appear.
- Email Customer Copy - While viewing a transaction's details, click the Options button for the option to email the customer a copy of the receipt.
- Map It- While viewing a transaction's details, click the Options button for the option to view the GPS location the transaction took place.
Reports
Reports will provide real time totals of transactions run within your Cash Register App during the current day. There are a few options to narrow the results of your report.

- Tender Types Filter: ACH, Cash, Check, Credit, Gift/Loyalty. You may also filter your credit card search by card type.
- Detail Level: Short will display the transactions that make up the total; Full includes the timestamp of each transaction.
- Clerk# Filter: View totals run by a specific user by entering the user's clerk #.
Additional features
- Manager Override managers and administrators must create an override code in the Portal. If a user tries to perform a function that they do not have permission to perform, a manager or admin may enter his/her override code for a one time authorization of that function.
- Cash Drawer Reconciliation when logging into a cash register to start a shift, the user can collect the starting balance of the cash drawer. During a shift, all cash transactions and the amount that should be in a cash drawer at any time are tracked. When a user is ready to close shift, the user is notified if there is discrepancy in the cash balance (shortage or overage).
Note: The options that control the cash drawer settings are configured in the Portal. Refer to Register Settings section for more details.
Supported Hardware
Click the product name to download the Manufacturers Specification sheet
| Device List | Image | Tablet | Printer | 1D Barcode Scanner | 2D Barcode Scanner | Cash Drawer |
|---|---|---|---|---|---|---|
| AZT A1088 |  |
✓ | ✓ | |||
| ELO Paypoint RevA | ✓ | ✓ | ✓ | ✓ | ||
| ELO Paypoint RevB | ✓ | ✓ | ✓ | ✓ | ||
| ELO PaypointPlus | ✓ | ✓ | ✓ | ✓ | ✓ |
| Device List | Image | EMV Reader | Printer | 1D Barcode Scanner | 2D Barcode Scanner | Cash Drawer |
|---|---|---|---|---|---|---|
| Miura M006 | ✓ | |||||
| Miura M007 |  |
✓ | ||||
| Miura M010 | ✓ | |||||
| Woosim R241 | ✓ | |||||
| Star TSP650 |  |
✓ | ||||
| AZT-BT-M520 |  |
✓ | ||||
| AZT-BT-M600 | ✓ | ✓ | ||||
| AZT-PCD-358 | ✓ | |||||
| AZT-ZQ-410F | ✓ |
Demos & FAQs
Add Product Catagory in Online Portal
Add Non Inventory Product in Online Portal
Add Promotion in Online Portal
Q: Is QuickSale™ PCI compliant?
A: Yes. All of CHARGE Anywhere payment applications are driven by our Level 1 PCI validated payment gateway, ComsGate. We maintain the highest levels of PCI standards and best practices to ensure cardholder data is kept safe from misuse and identify theft. Utilizing the services of Compliance Point, the industry leader in CISP/PCI compliance, CHARGE Anywhere undergoes a continuous, rigorous audit process to confirm that our products and services are compliant with the latest Card Association regulations.
Q: Can QuickSale™ work with my processor?
A: Yes. QuickSale™ can work with any major processor in the US and Canada. Specifically for QuickSale™ Cash Register here is a list of processors that are compatible.
| FDMS Rapid Connect* | Chase Payments* | TSYS (Vital)* |
|---|
* Processor is certified for EMV transactions
Q: What are the costs associated with QuickSale™?
A: All fees are designated by your merchant service provider. Please contact your merchant service provider for a price quote.
Q: Do I have to turn off my old payment processing software before using QuickSale™ for Android?
A: No, QuickSale™ for Android does not interfere with any other processing software you are currently using. However, if you are utilizing a card reader, it may not be able to work properly in two different software simultaneously.
Q: How do I batch my transactions?
A: CHARGE Anywhere is a host capture gateway. All approved transactions are automatically batched by CHARGE Anywhere and sent to your processor for funding. There is nothing you will need to do to initiate the batch.
Q: How do I change my automated batch time?
A: You can contact your merchant service provider or CHARGE Anywhere Customer Support to change your batch time. Batches can be set to automatically close on any hour of the day.
Q: Are my transactions accessible online?
A: Yes. All transactions are stored in the online Transaction Manager for 24 months. After 24 months, all records are archived and can be retrieved upon request.
Q: What kind of customer support does QuickSale™ offer?
A: CHARGE Anywhere Customer Support and Technical Support are available Monday through Friday from 9am to 7pm ET.
Common Error Handling
Unimag Audio Jack Reader Doesn't Connect