Difference between revisions of "Add Recurring Payment"
From KB
| Line 32: | Line 32: | ||
<div align="center"> | <div align="center"> | ||
<gallery widths=200px heights=150px> | <gallery widths=200px heights=150px> | ||
| − | File:AddReccuringPayment. | + | File:AddReccuringPayment.png| '''1.''' Add Recurring Payment |
File:RecurringPaymentAdded.png| '''2.''' Recurring Payment Added | File:RecurringPaymentAdded.png| '''2.''' Recurring Payment Added | ||
</gallery> | </gallery> | ||
</div> | </div> | ||
Revision as of 15:03, 22 January 2018
To add a recurring payment:
1. Go to Virtual Terminal > Recurring Database > Add Recurring Payment. Fill out the appropriate fields.
- Terminals: Select a terminal to associate the recurring transaction with
- Effective Date: Select the date when the first transaction will be processed. (Effective Date cannot be today)
- Frequency: Choose how often payments will be processed. (Daily, Weekly, Biweekly, Monthly, Annually, Quarterly, Semiannually)
- # of payments: Enter how many times the recurring database will initaite a sale.
- Customer: Enter a customer name or select a customer from your Customer Profiles section on the right hand side. Customer Profiles list all customers in your Customer Database.
- Card #: Enter the credit card number. (No symbols or spaces)
- Exp Date: Enter the expiration date of the card, (MMYY)
- Card Present: (No/Yes) Select yes if the credit card is physically present when adding the recurring payment.
- Address: Billing address of the credit card. (Numerical Values are the qualifier)
- Zip Code: Billing zip code of the credit card.
- Amount: Enter transaction amount that will be processed on each recurring payment.
- Invoice #: You may choose to enter an invoice #. This field is used as a reminder of why you added the recurring payment.
2. Click Submit. The recurring payment will be stored within your Recurring Database.
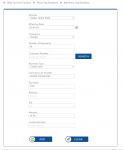
1. Add Recurring Payment
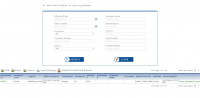
2. Recurring Payment Added

