Transaction Manager
Getting Started
1. Go to the online Transaction Manager and enter your username and password. The username for Transaction Manager is included in your activation email. The password is sent in a seperate email for security purposes.
2. Confirm Your Identity - To better serve and protect our customers, a new user will need to undergo a quick security procedure.
3. Log in with your username and newly created password.
Processing Transactions
Web Terminal - Process a credit, ACH or gift/prepaid transaction.
Batch Transactions - Batch Transactions may be used to process multiple credit card transactions by uploading a CSV file or comma delimited text file with transaction data.
Other Transactions
Batch Transactions
Batch Transactions may be used to process multiple credit card transactions by uploading a CSV file or comma delimited text file with transaction data.
Import Setup - Select the order of the transaction data listed within your file. (Amount, Card # and ExpDate are required fields)
Comsgate Batch Specs - media:Comsgate Batch Specs.pdf
1. To process batch transactions, go to Virtual Terminal > Batch Transactions.
2. Click Import Setup and configure it to match the transaction data listed in your file.
3. Browse for your file and click "Click to Upload".
4. Verify that all information was imported correctly. (If you have multiple devices with CHARGE Anywhere, select which device you want the transactions to be associated with using the dropdown menu.)
5. Click "Process Batch". (Wait a few moments for all transactions to be processed and once processed, you will see a listing of the results of each transaction.)

Sample Batch File w/ Transaction Data
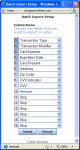
Import Setup (step 2)
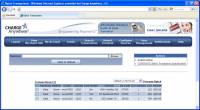
Imported Transaction (step 4)
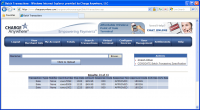
Transaction Responses


Recurring Transactions
Initiate a set number of sale transactions to be automatically processed against a customer's account within a scheduled time frame. (Recurring Database comes free for anyone merchant active with the CHARGE Anywhere for QuickBooks product. Otherwise, it is considered and add-on service.)
1. To create a recurring transaction, go to Virtual Terminal > Recurring Database > Add Recurring Payment. Fill out the appropriate fields.
- Terminals: Select a terminal to associate the recurring transaction with
- Effective Date: Select the date when the first transaction will be processed. (Effective Date cannot be today)
- Frequency: Choose how often payments will be processed. (Daily, Weekly, Biweekly, Monthly, Annually, Quarterly, Semiannually)
- # of payments: Enter how many times the recurring database will initaite a sale.
- Customer: Enter a customer name or select a customer from your Customer Profiles section on the right hand side. Customer Profiles list all customers in your Customer Database.
- Card #: Enter the credit card number. (No symbols or spaces)
- Exp Date: Enter the expiration date of the card, (MMYY)
- Card Present: (No/Yes) Select yes if the credit card is physically present when adding the recurring payment.
- Address: Billing address of the credit card. (Numerical Values are the qualifier)
- Zip Code: Billing zip code of the credit card.
- Amount: Enter transaction amount that will be processed on each recurring payment.
- Invoice #: You may choose to enter an invoice #. This field is used as a reminder of why you added the recurring payment.
2. Click Submit. The recurring transaction will be stored within your Recurring Database.
- Error creating thumbnail: Image type not supported
1. Add Recurring Payment
- Error creating thumbnail: Image type not supported
2. Recurring Payment Added
Bill Presentment
Email invoices or statements to your customer that includes a link to a secured site so that the customer may enter their own payment information. (Bill Presentment is an add on service)
To configure your Bill Presentments: see Bill Presentment Setup
1. To send a bill presentment, go to Virtual Terminal > Send Invoice to Customer.
2. Click Browse and locate the invoice/statement that you wish to include in the Bill Presentment. Click Upload.
3. Fill out the Customer Name, Customer Email, Invoice#, Description, Amount, Merchant Email and any Custom Text you wish to be included in the email. Click Send Bill.
4. Your customer will receive an email from you with a link to a secured site to enter his/her payment information. You can view the status of nay sent bill presentment by going to Virtual Terminal > View Bill Presentments.